4 Crochet Bucket Hat Free Patterns That Are Easy to Follow
Bucket hats never go out of style, and crocheting your own means you get the exact fit, color, and texture you actually want. Whether you are a beginner or have been hooking for years, these four patterns will give you something worth making.
Each one covers a different style: a clean classic, a checkered design, a ruffled statement piece, and a subtle wave brim. Pick one, grab your hook, and let’s get started.
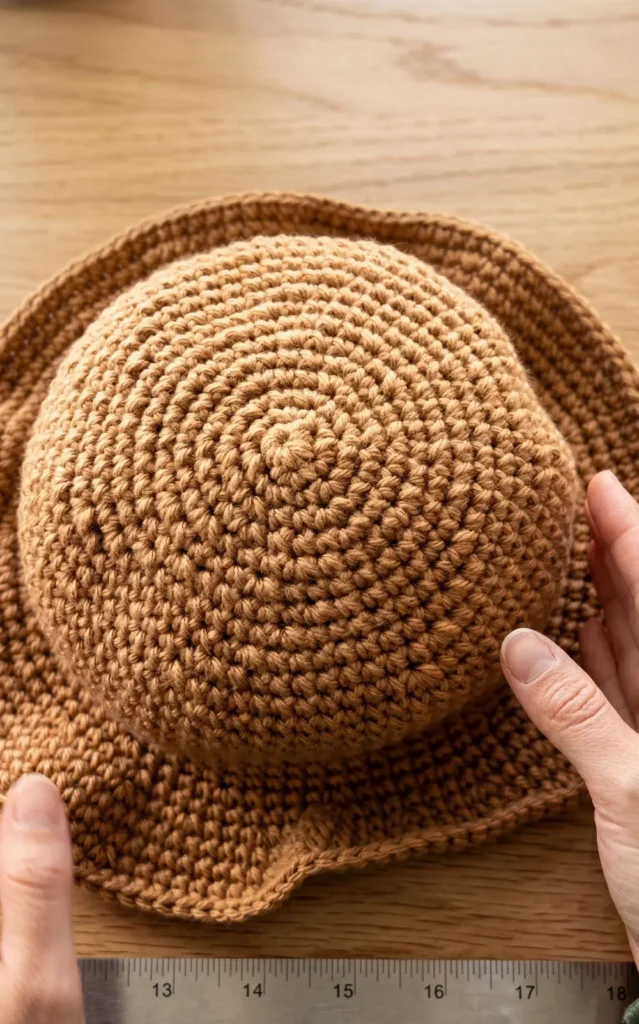
1: Quick & Easy Crochet Bucket Hat Tutorial
To begin this project, you will need a 5 mm crochet hook, a yarn needle, and some white acrylic yarn. These basic tools will help you create a simple and stylish bucket hat.
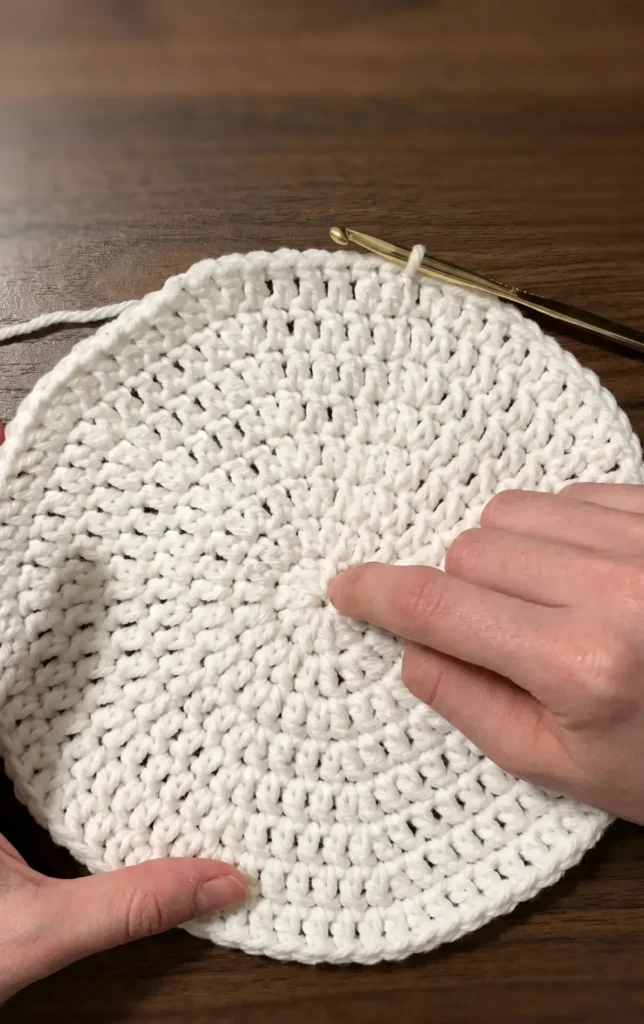
Step 1: Creating the Top of the Hat
The foundation of the hat starts with a magic ring or circle. Wrap the yarn around two fingers to form an X, use your hook to go under and over, and pull a loop through.
Round One
Start the first round by chaining two. Complete 10 double crochets into the center of the ring. Once finished, pull the tail end of the yarn tightly to close the center hole. End the round by performing a slip stitch into the first double crochet, making sure to skip the initial chain two.
Increasing the Rounds
Every subsequent round will begin with a chain of two and end with a slip stitch. For round two, perform an increase in every single stitch, which means placing two double crochets into each stitch for a total of 20 stitches. For round three, increase in every second stitch to reach a total of 30 stitches.
For the fourth round, increase in every third stitch. A useful trick for counting is to subtract one from the round number to find the stitch where you should increase. Alternatively, you can look for the increase from the previous round and place your new increase in the stitch right between those two double crochets. Continue this pattern until the circle reaches the necessary circumference for your head. Generally, seven total rounds fit a small size, eight rounds fit a medium, and nine rounds fit a large.
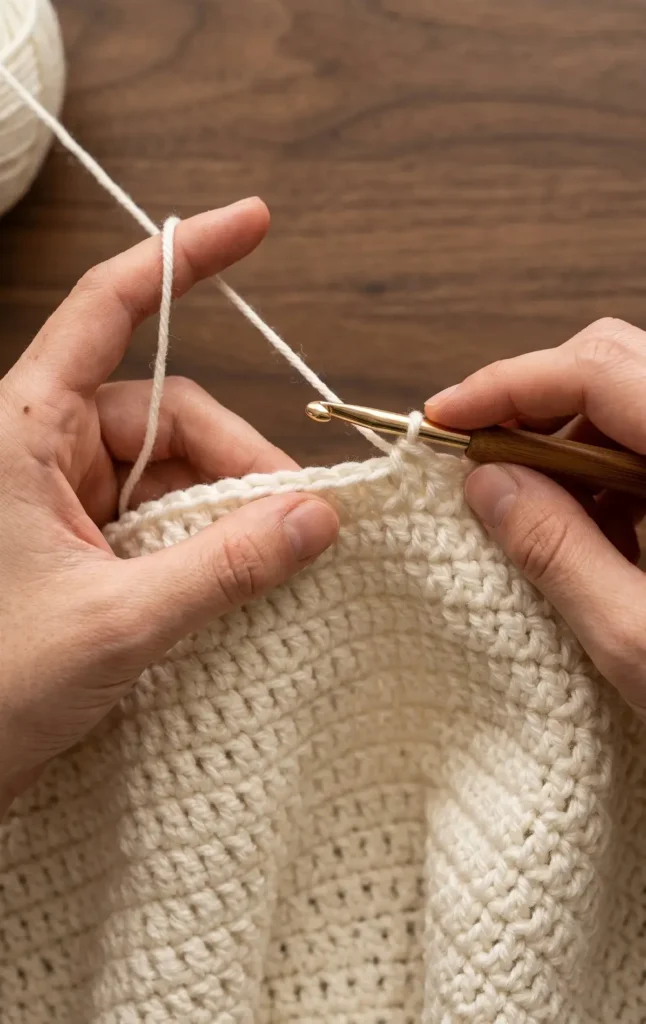
Step 2: Crocheting the Body of the Hat
Once you have finished the increase rounds for the top, you will stop increasing and begin working on the sides.
The Transition Round
To create the bend where the top of the hat meets the sides, chain two and work one double crochet into the back loops only for the entire round. This specific technique forms a fold that allows the hat to shape downward.
Building the Length
For the next several rounds, work one regular double crochet into both loops of every stitch. Continue this process without any increases until the body of the hat reaches your desired length. A common length is approximately seven rounds from the top fold to the start of the brim.
Step 3: Crafting the Brim
The brim is designed to flare outward to give the hat its classic silhouette.
Starting the Flare
For the first round of the brim, work in the front loops only to make the edge pop out. You will also resume increasing by picking up where you left off at the top of the hat. For example, if you did eight rounds for the top, this first brim round would be your ninth increase round, meaning you increase in every eighth stitch.
Finishing the Brim
After the first round of the brim, work under both loops for all following rounds. Alternate between a round of increases and a regular round of double crochets until the brim is the length you want. It is recommended to end on an odd numbered round with an increase to ensure the bottom of the brim does not curve inward.
Step 4: Finishing Touches
To complete your hat, you must secure the yarn and tidy up the loose ends.
Fastening Off
Fasten off the project by chaining one and cutting a strand of yarn long enough to weave in. Use your hook to pull the strand through the loop and tighten the knot.
Weaving in the Ends
Turn the hat inside out so the work is less visible on the exterior. Use a yarn needle to thread the tail from the magic ring and tie a secure knot so the top hole does not loosen. Weave the needle under several stitches in one direction, then skip one stitch and weave back through those same stitches in the opposite direction. This method ensures the ends are secure even if the yarn is tugged. Repeat this for all loose ends before cutting off the excess yarn.
Video Credits: VivCrochets
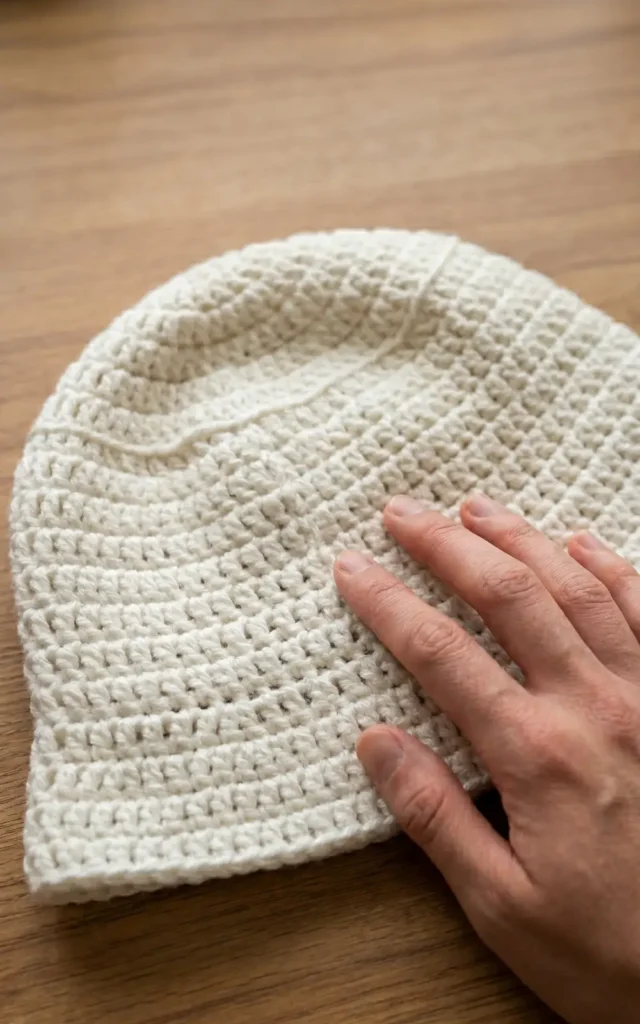
2: How to Crochet a Bucket Hat Tutorial
This tutorial provides a step by step guide to creating a stylish and functional bucket hat using simple single crochet stitches. By following these instructions, you can create a piece that is customized to your head size with a “nice subtle wave effect” on the brim.
Materials and Tools
To begin this project, you will need the following items:
- Yarn: One ball of 100 percent acrylic yarn (approximately 170 grams). The example uses the color “Camel”.
- Crochet Hook: A 5.5 mm crocheting needle.
- Stitch Marker: A simple bobby pin works well to keep track of your rows.
- Measuring Tools: A ruler to check the diameter of the hat crown.
- Finishing Tools: Scissors and a thick needle for weaving in the yarn ends.
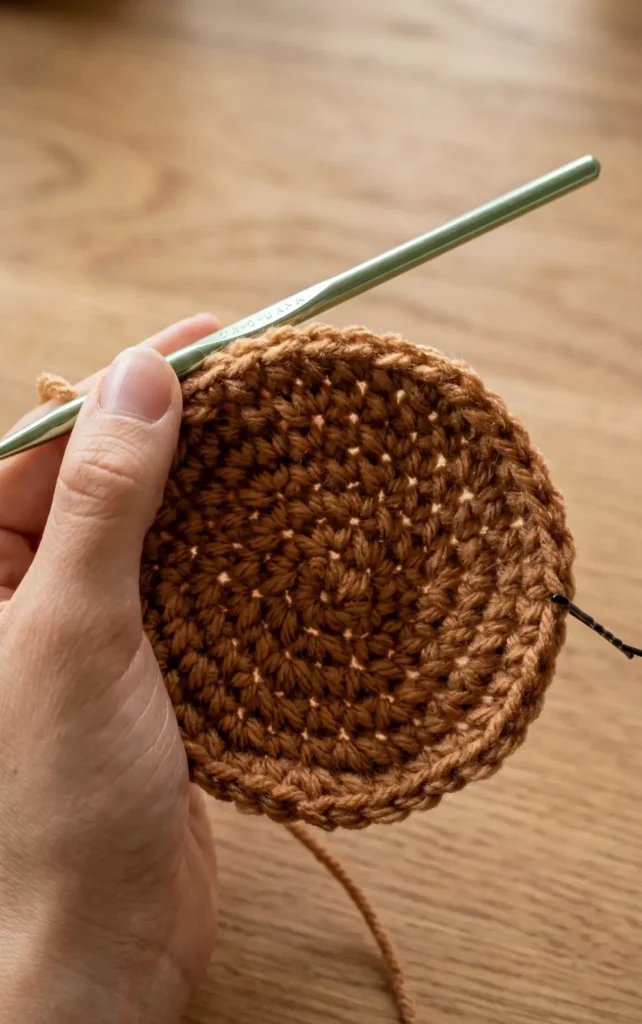
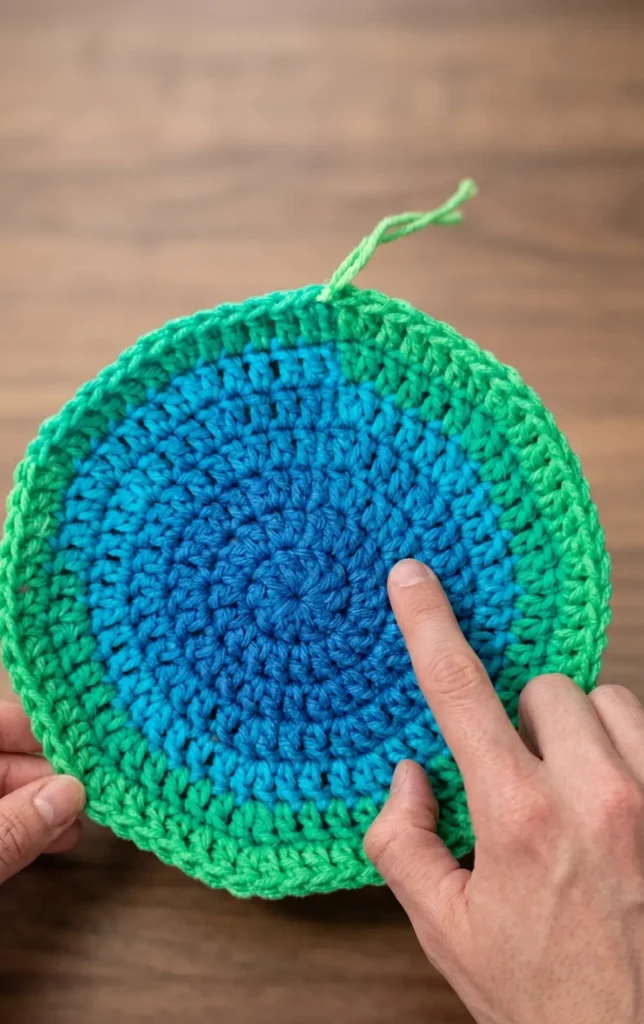
Starting the Top Circle

The hat begins with a magic circle, which allows you to pull the center tight so there is no hole at the top of your hat.
- Wrap the yarn around three fingers to create an “X” shape.
- Use your hook to pull the back yarn through to the front, creating a loop.
- Work six single crochets into this starting circle.
- Pull the tail piece of the yarn tightly to close the circle.
Increasing the Crown (Rows 2 to 12)
To make the hat fit the top of your head, you must increase the number of stitches in each row to create a flat circle.
- Row 2: Perform two single crochets into each of the six stitches from the first row, resulting in 12 stitches total.
- Row 3: Alternate by doing one single crochet in the first opening and two single crochets in the second opening.
- Row 4: Do one single crochet in the first two openings, then two single crochets in the third opening.
- Row 5: Do one single crochet in the first three openings, then two single crochets in the fourth opening.
- Row 6: Do one single crochet in the first four openings, then two single crochets in the fifth opening.
- Row 7: Do one single crochet in the first five openings, then two single crochets in the sixth opening.
- Row 8: Do one single crochet in the first six openings, then two single crochets in the seventh opening.
Continue this pattern (increasing the number of single stitches between each increase) until the circle is wide enough to cover the top of your head. For a standard size, complete 12 rows until the circle measures approximately 6 and a quarter inches in diameter.
Crocheting the Sides (Rows 13 to 26)
Once the crown is the correct size, you will stop increasing to allow the hat to curve downward.
- For Rows 13 through 26, perform exactly one single crochet into every stitch around.
- This section consists of 14 rows of straight stitching.
- When finished, the hat should be approximately seven inches wide. It is recommended to try the hat on at this stage to ensure it fits comfortably.
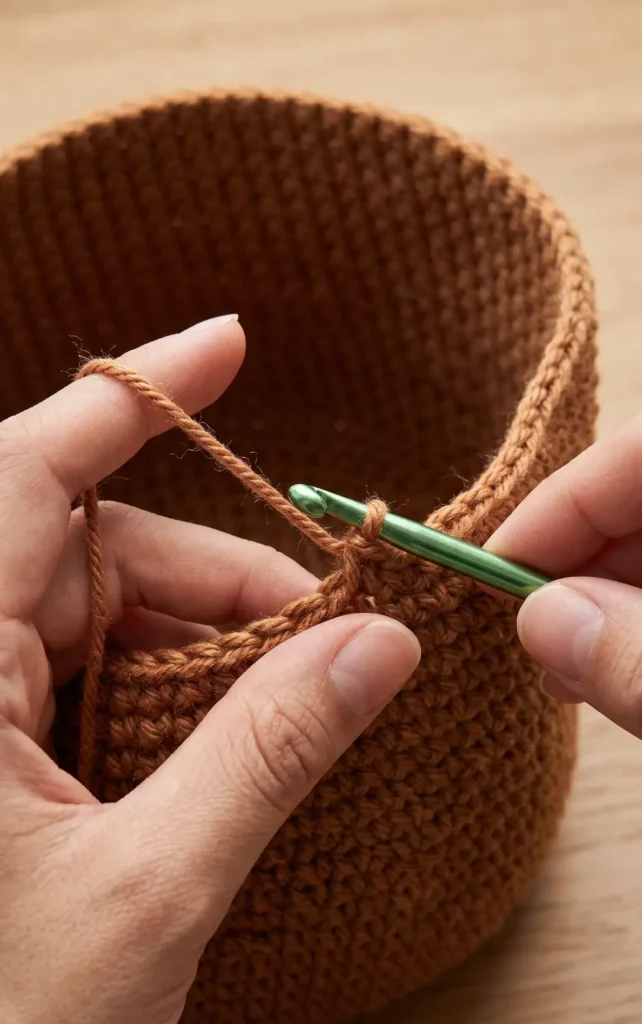
Creating the Brim (Rows 27 to 33)
The brim is created by reintroducing increases to make the edges flare outward.
- Row 27: Work four single crochets, then increase with two single crochets in the fifth spot.
- Row 28: Work ten single crochets, then increase in the 11th spot.
- Row 29: Work three single crochets, then increase in the fourth spot.
- Rows 30 and 31: Perform one single crochet in every stitch with no increases.
- Row 32: Work nine single crochets, then increase in the tenth spot.
- Row 33: For the final row, perform one single crochet into every spot to create a clean edge.
Finishing Touches
To finish your bucket hat, snip the yarn and pull the end piece through the final loop to tighten it. Use a thick needle to weave the tail downward into the stitches on the inside of the hat so the transition is not harsh. Finally, tie a small knot with the starting string inside the crown and cut off any excess yarn. Your “nice and crispy” finished bucket hat is now ready to wear.
Video Credits: NoteswNat
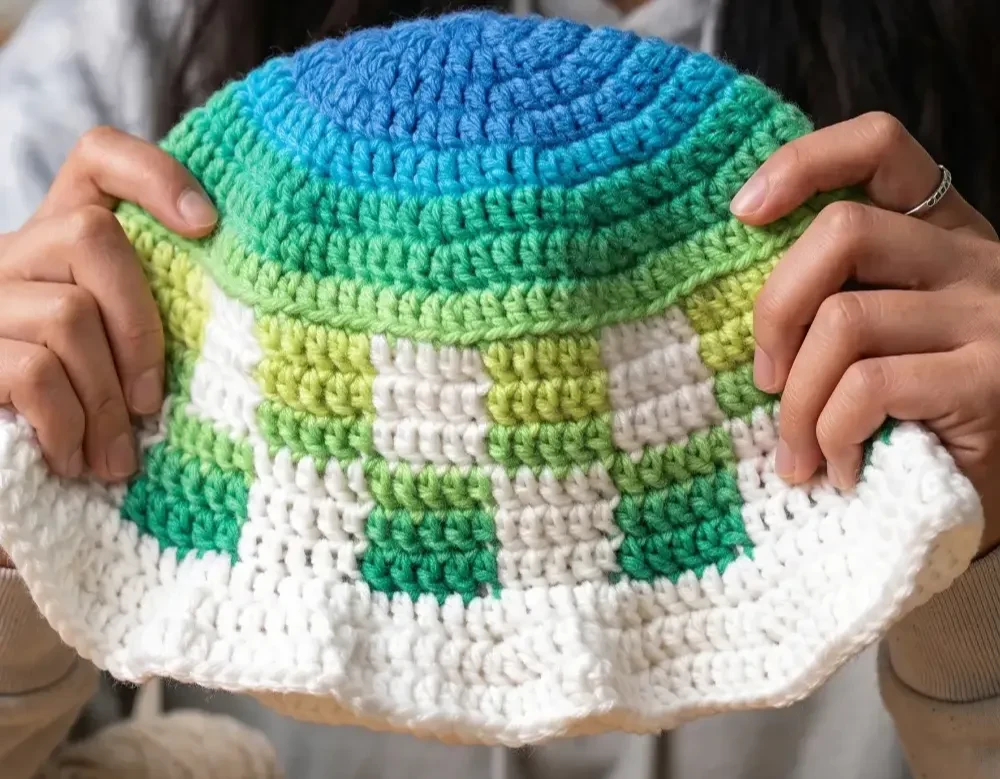
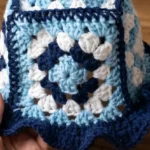
3: Crochet Checkered Bucket Hat Tutorial
This tutorial guides you through creating a stylish checkered bucket hat featuring a wavy brim, using a method that does not require a magic ring.
Materials and Preparation
To get started, you will need the following supplies:
- Yarn: Approximately 72 grams of medium (number four) weight yarn. The tutorial uses 100% acrylic Red Heart Super Saver in “White” and Red Heart Super Saver Stripes in “Parrot Stripe,” though cotton yarn also works well.
- Crochet Hook: A 5 mm clover amour crochet hook (you may use a smaller size if you prefer a stiffer hat).
- Tools: A yarn needle for weaving in ends and a pair of scissors.
Begin by making a slip knot with your coloured yarn, leaving a six inch tail for weaving. Chain three and then slip stitch into the very first chain to form a small loop.
Creating the Top of the Hat (Rounds 1 to 8)
The top of the hat is worked in rounds of double crochet, with increases in each round to expand the circle.
- Round 1: Chain two (this does not count as a double crochet). Work ten double crochets into the centre of your chain loop. Slip stitch into the first double crochet to close the round.
- Round 2: Chain two. Perform an increase (two double crochets) into every stitch around, resulting in 20 total stitches. Slip stitch to finish.
- Round 3: Chain two. Work one double crochet in the first stitch and an increase in the second stitch. Repeat this pattern (one, then two) to reach 30 total stitches.
- Rounds 4 to 8: Continue increasing the number of single double crochets between each increase in every round. For example, Round 4 involves an increase in every third stitch (one, one, two). Complete eight rounds in total for the top.
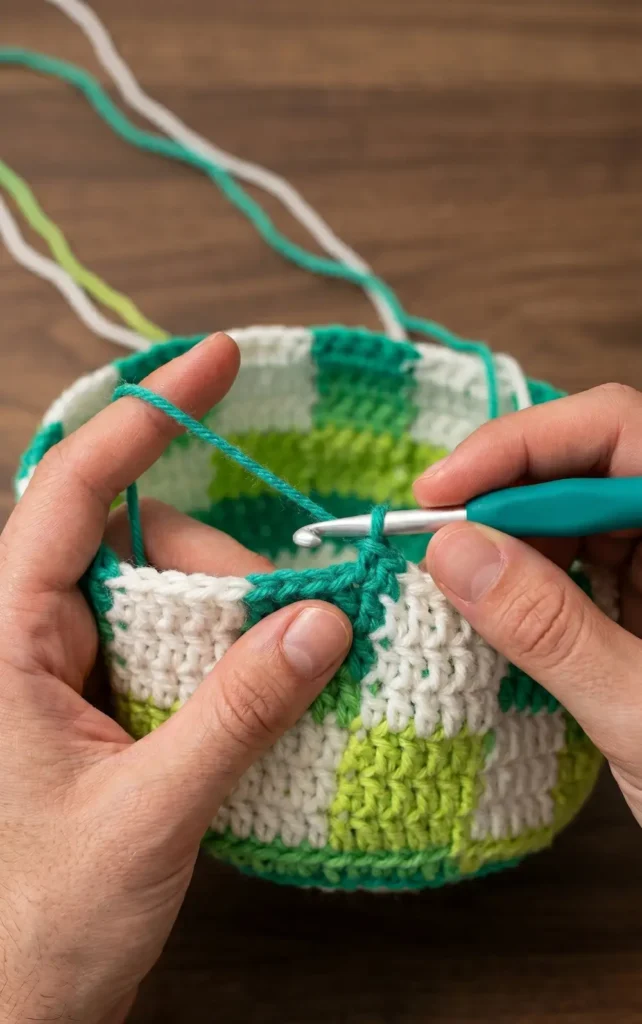
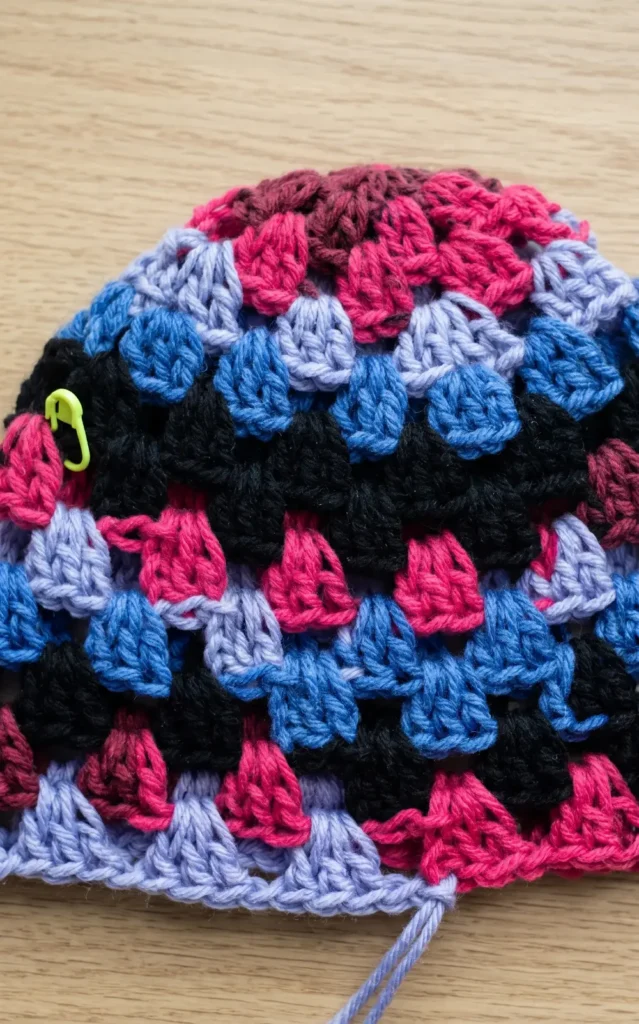
Building the Checkered Body
The body of the hat creates the checkered pattern and uses the back loop only (BLO) technique for the first round to help the hat transition and bend downwards.
- Round 9 (Body Round 1): Work five double crochets in your first colour, then change to white yarn during the final pull through of the fifth stitch.
- Carrying Yarn: As you work with the new colour, lay the previous yarn strand over your hook to “carry” it along to the next colour change.
- Square Size: Each coloured square is five double crochets wide and three rounds tall. Repeat the pattern of five stitches per colour for three rounds to finish the first set of squares.
- Alternating Colours: After three rounds, switch the colours (placing white on top of the first colour) and work another three rounds. This provides a body length of about three inches.
Adding the Wavy Brim
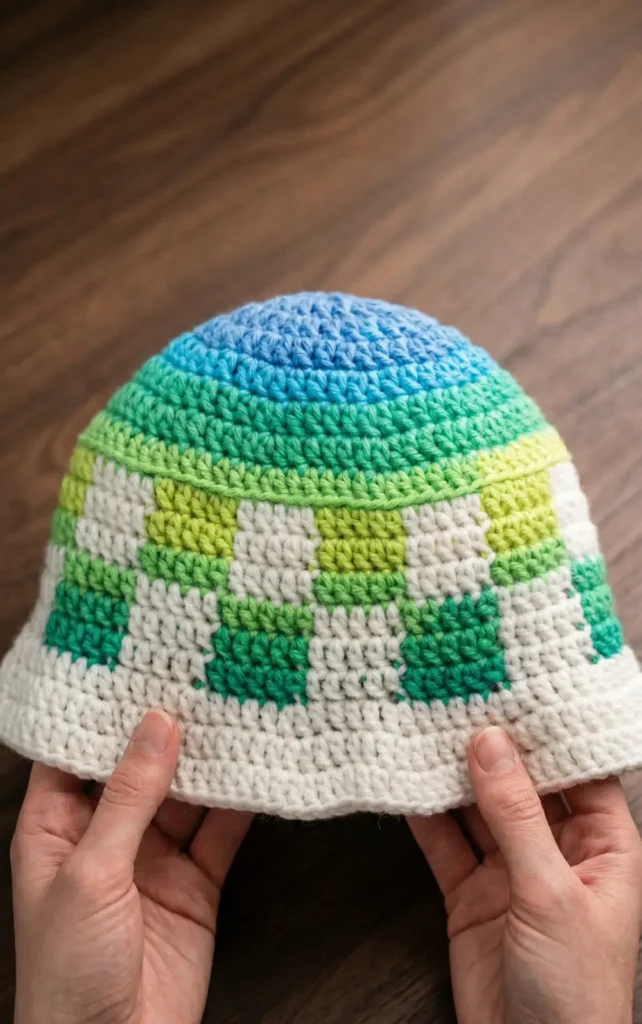
The brim starts by working in the front loop only (FLO) to allow it to flare out.
- Brim Round 1: Using your chosen brim colour, work four double crochets in the front loops, followed by an increase in every fifth stitch. This should result in 96 total stitches.
- Brim Round 2: Work under both loops for the remainder of the brim. Increase in every sixth stitch, reaching 112 total stitches.
- Brim Round 3: Increase in every seventh stitch, finishing with 128 stitches. If you desire a longer brim, you can continue adding rounds with increases in every eighth, then ninth stitch.
Finishing Touches
Once the brim is the desired length, slip stitch and fasten off, leaving a five inch tail. Turn the hat inside out to make weaving in the ends easier. Use your yarn needle to thread the loose ends under several stitches of the same colour, reversing direction a few times to ensure they are secure before snipping the excess yarn. Your checkered bucket hat is now complete.
Video Credits: VivCrochets
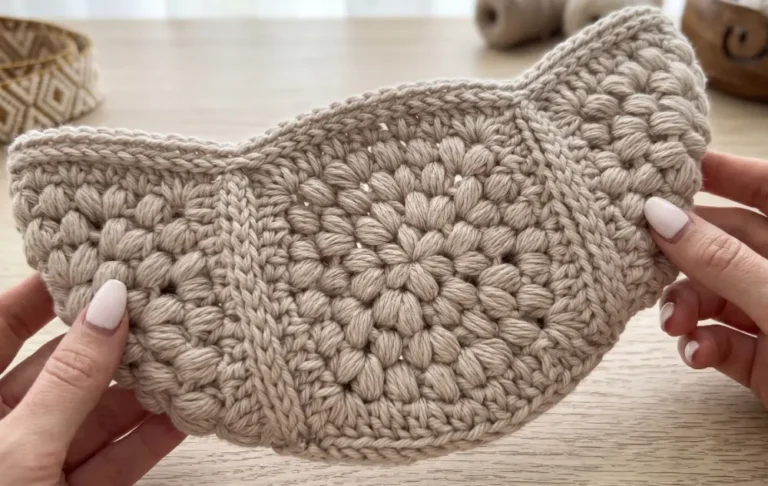
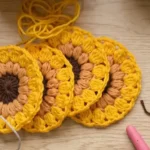
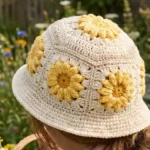
4: Easy Crochet Bucket Hat with Ruffles
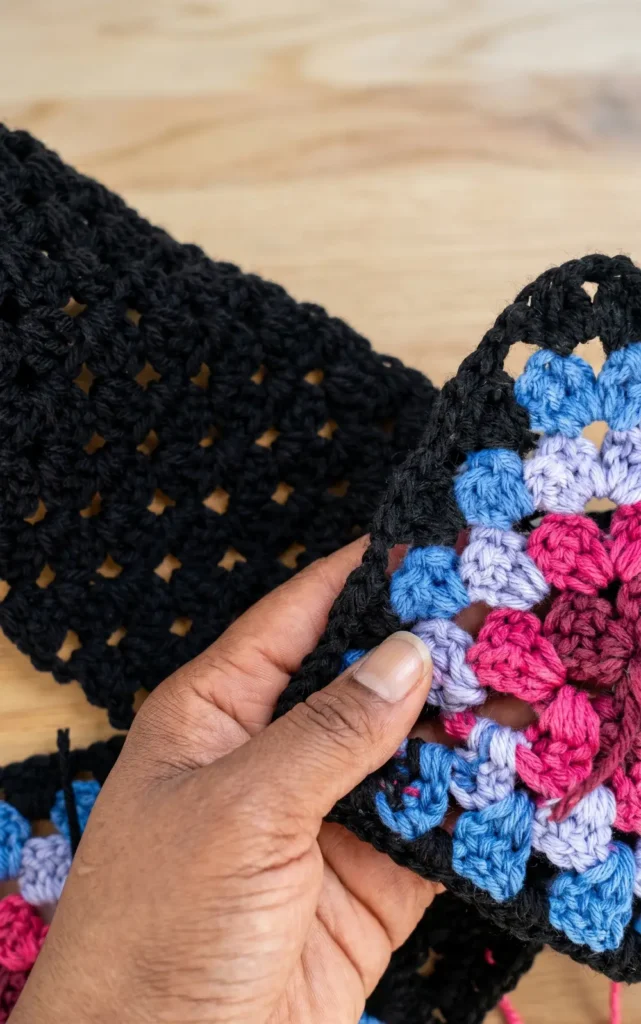


This tutorial provides a comprehensive guide to creating a stylish granny square style bucket hat with dramatic, oversized ruffles. This project is highly customizable and can be adjusted to fit different head sizes by varying the number of initial stitches.
Essential Materials and Tools
To get started on this project, you will need the following supplies:
- Yarn: Two skeins of Medium 4 weight yarn are recommended. The original design uses a multi-colored “no color switching” yarn by Red Heart, though you can use any colorway or solid black for a matching set.
- Crochet Hook: A 5.5 mm (US I-9) crochet hook.
- Stitch Marker: To help keep track of your rounds.
- Scissors: For cutting yarn.
- Darning or Tapestry Needle: For weaving in your ends.
Step 1: Creating the Foundation and Round 1
Begin by making a slip knot and chaining four. All your double crochets for the first round will be worked into the very first chain you made. The number of stitches depends on the desired hat size:
- Small: 7 double crochets.
- Medium: 9 double crochets.
- Large: 11 double crochets.
The initial chain three counts as a stitch, so a small size will have a total of eight stitches for round one. Close the round by slip stitching into the third chain of the starting chain three.
Step 2: Increasing the Crown (Round 2)
Chain three and place a double crochet into the same space where you slip stitched. For the rest of the round, place two double crochets into every stitch from the previous round, chaining one between each pair of stitches. For a small hat, you will end with 16 double crochets plus the chain one spaces. Slip stitch into the top of the starting chain three to finish.
Step 3: Transitioning to Granny Clusters (Round 3)
Slip stitch across the next double crochet and into the first chain one space. Chain three and work two double crochets into that same space to create your first cluster of three. Chain one, skip two stitches, and work three double crochets into the next chain one space. Repeat this pattern around: three double crochets in every chain one space, with a chain one between each grouping.
Step 4: The Increase Rounds (Rounds 4 and 5)
Round four is an increase round where you alternate between clusters. In the first chain one space, work four double crochets; in the next space, work three double crochets. Continue alternating four and three double crochets around, always chaining one between the groupings.
In round five, you will revert to groupings of three. Work a three double crochet cluster into the chain one spaces as usual. When you reach a grouping of four from the previous round, place a cluster of three double crochets into the third stitch of that grouping. This creates the necessary width for the hat crown.
Step 5: Establishing the Hat Depth
For the next several rounds, work three double crochets into every chain one space and chain one between each grouping. Continue these rounds until the hat reaches your desired depth. For a standard small size, the hat should be approximately 7 inches (18 cm) deep from the top.
Step 6: Creating the Intense Ruffles
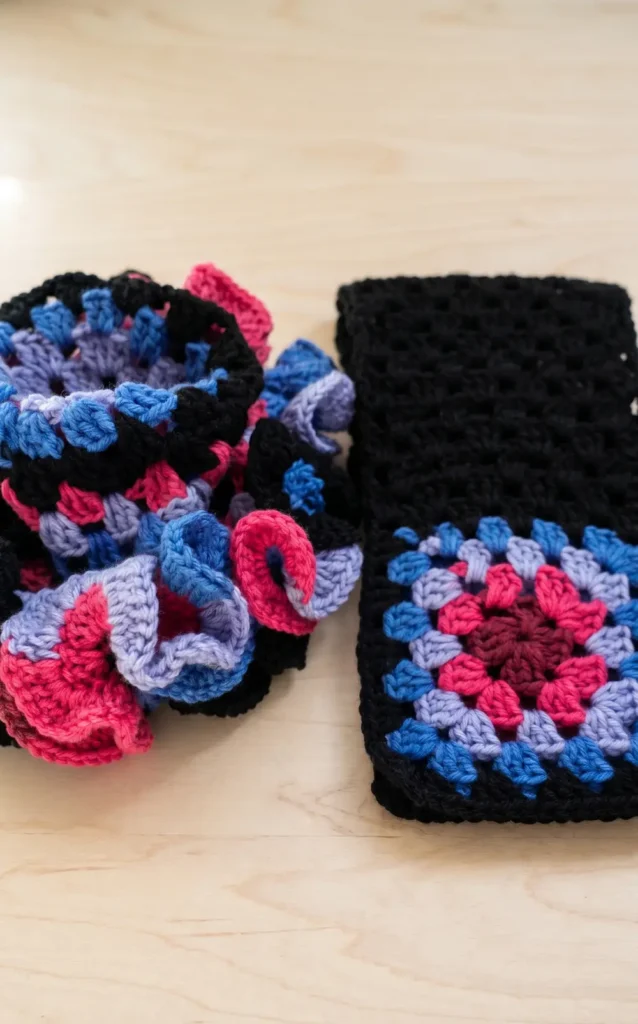
The ruffle section consists of three rounds that will significantly increase your stitch count.
- Ruffle Round 1: Work three double crochets into every single double crochet stitch and every chain one space from the previous round.
- Ruffle Rounds 2 and 3: Work three double crochets into every single stitch around.
Because you are tripling the number of stitches in each round, these final stages will consume a large amount of yarn and take more time to complete.
Step 7: Finishing the Hat
To finish, bypass the starting chain three of the final round and slip stitch directly into the adjacent double crochet. Chain one, cut the yarn, and fasten off. Use your tapestry needle to weave in the starting and ending tails to secure your work.
Video Credits: Atreyu Crochet
Which Bucket Hat Pattern Are You Starting With?
Any of these four patterns can take you from a ball of yarn to a finished hat in just a few hours. The hardest part is honestly picking which one to make first.
Try one, wear it, then come back and make another. Share your finished hat in the comments because seeing your color choices and yarn picks is always the best part.